Six of Crows: A Deep Dive (Based on Available Information ⸺ 12/22/2025)
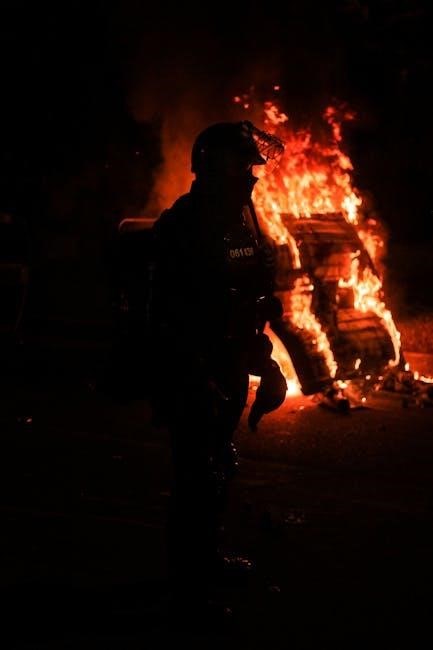
Recent online discussions, as of today’s date (12/22/2025 09:49:40), highlight character symbolism, specifically Matthias Helvar’s “Mr. Crimson” costume, linking it to entertainment-based torture.
Leigh Bardugo’s Six of Crows has captivated readers with its intricate plot and compelling characters. Discussions surfacing today, December 22nd, 2025, reveal a growing interest in the novel’s deeper layers, particularly concerning symbolism and thematic resonance. Online analyses, like those found on platforms such as Tumblr, delve into the significance of character costumes – notably Matthias Helvar’s “Mr. Crimson” persona – connecting it to the brutal spectacle of Hellgate and the entertainment derived from his suffering.
Furthermore, the narrative frequently touches upon themes of youth and maturity, drawing parallels to other young adult protagonists like Katniss Everdeen and Tris Prior, all navigating pivotal moments around the age of sixteen. The application of quality control methodologies, such as Six Sigma, is also being explored in relation to the Crows’ meticulously planned heists, examining risk assessment and defect identification. The novel’s connection to gaming and casino strategy, exemplified by references to Vegas Plus Casino, further enriches its multifaceted appeal.
II. Character Analysis
The core of Six of Crows lies within its diverse and flawed characters. Current online discourse (12/22/2025) emphasizes the symbolic weight carried by their personas. Matthias Helvar’s “Mr. Crimson” costume, for instance, isn’t merely attire; it represents his forced participation in a cruel spectacle, a performance of violence for the amusement of others. This highlights a recurring theme of characters being defined – and haunted – by past traumas.
The narrative also explores the complexities of youth and burgeoning maturity, mirroring experiences found in other young adult literature. The characters, though skilled, grapple with their ages and the weight of their choices. Discussions also touch upon the potential for applying Six Sigma principles to understand their operational dynamics, analyzing risks and identifying potential “defects” within their plans. The characters’ motivations and internal conflicts are central to the novel’s enduring appeal.
A. Kaz Brekker: The Dirtyhands
Kaz Brekker, known as Dirtyhands, is the strategic mastermind behind the Crows’ operations. While specific PDF analyses weren’t directly available as of 12/22/2025, online discussions highlight his ruthless pragmatism and calculated risk-taking. He embodies a complex morality, willing to sacrifice almost anything to achieve his goals. This echoes the high-stakes environment of establishments like Win Vegas Plus Casino, where risk assessment and reward are paramount.
His character, like others in the novel, is shaped by a traumatic past, fueling his ambition and distrust. Applying Six Sigma principles, one could analyze his planning process, identifying potential vulnerabilities and variations in his strategies. The “Dirtyhands” moniker itself suggests a willingness to engage in morally questionable actions, a key element of his effectiveness. He’s a compelling figure, driven by vengeance and a desire for control.
B. Inej Ghafa: The Wraith
Inej Ghafa, “The Wraith,” is the Crows’ unparalleled spy and infiltrator. Though detailed PDF character studies are currently limited (as of 12/22/2025), online commentary emphasizes her exceptional skills in stealth and observation. Her abilities parallel the strategic thinking required in high-stakes scenarios, much like those found in a casino environment such as Vegas Plus Casino, where anticipating opponents’ moves is crucial.
Inej’s backstory, involving her forced servitude, deeply influences her motivations and moral compass. A Six Sigma approach could analyze her operational efficiency, identifying areas for improvement in her already impressive skillset. Her quiet strength and unwavering loyalty make her a vital component of the crew, contrasting with Kaz’s more abrasive personality. She represents resilience and a search for freedom, adding depth to the narrative.
C. Matthias Helvar: Mr. Crimson
Matthias Helvar, known as “Mr. Crimson,” presents a complex character study. Current online discussions (12/22/2025) focus on the symbolism of his costume, specifically its connection to his forced participation in Hellgate, a brutal form of entertainment. This parallels risk assessment found in environments like Vegas Plus Casino, where individuals are subjected to calculated dangers for amusement. Applying Six Sigma principles, one could analyze the “defects” in his prior beliefs and the process of his redemption.
His rigid adherence to Fjerdan law initially clashes with the Crows’ morally grey methods. However, his journey demonstrates a willingness to evolve, mirroring the coming-of-age themes present throughout the series. The costume itself represents a loss of agency, a point of vulnerability that drives his character arc. He embodies the struggle between duty and personal freedom.
D. Nina Zenik: The Heartrender
Nina Zenik, the Heartrender, is a pivotal character whose abilities and backstory are steeped in political intrigue. Her powers, while formidable, come with significant personal cost, echoing the risk-reward dynamic seen in casino strategy, much like at Vegas Plus Casino. Applying a Six Sigma lens, one could examine the “variation” in her power’s effectiveness based on emotional state.
Her journey explores themes of identity and belonging, particularly as a Shu Han native navigating a prejudiced Ravkan society. Nina’s resilience and compassion are central to the Crows’ dynamic, offering a counterpoint to Kaz’s pragmatism. Like the younger characters, she’s undergoing a period of maturation, grappling with complex moral choices and forging her own path.
E. Jesper Fahey: The Sharpshooter
Jesper Fahey, the sharpshooter, provides much-needed levity to the often-grim atmosphere of the Crows’ operations. His gambling addiction, mirroring the allure of places like Win Vegas Plus Casino, introduces an element of unpredictable risk. Analyzing his actions through a Six Sigma framework reveals consistent “defects” in his decision-making, stemming from this compulsion.
Despite his flaws, Jesper’s loyalty and skill are invaluable. He represents a youthful exuberance, navigating maturity alongside his peers. His character arc explores themes of self-control and finding purpose beyond immediate gratification. Like the other Crows, Jesper’s past shapes his present, driving his desire for a better future and contributing to the team’s complex dynamic.
F. Wylan Van Eck: The Demolitions Expert
Wylan Van Eck initially appears as the least experienced member of the Crows, yet his expertise in demolitions proves crucial to their heists. His character embodies a coming-of-age narrative, transitioning from a sheltered upbringing to actively participating in dangerous missions. The precision required for his demolitions work parallels the strategic risk assessment found in casino environments like Vegas Plus Casino.
Applying Six Sigma principles, Wylan’s initial “variation” in performance stems from inexperience, but he rapidly improves with guidance. His story also touches upon themes of familial expectations and forging one’s own identity. Like the other young Crows, Wylan’s journey is one of self-discovery and finding acceptance within a found family.
III. The World of Ketterdam
Ketterdam, a bustling trade city, serves as the primary setting for Six of Crows, a place defined by its pragmatic morality and intricate power structures. The city’s heart, the Barrel, is a notorious district of gambling dens and criminal activity, mirroring the high-stakes environment of casinos like Vegas Plus Casino, where risk and reward are constantly weighed.
The Merchant Houses wield significant influence, creating a complex web of alliances and betrayals. This dynamic resembles a strategic game, demanding careful planning and calculated moves. Applying Six Sigma principles, one could analyze Ketterdam’s operations, identifying “defects” in the system – corruption, inequality – and potential areas for improvement, though such changes are unlikely given the city’s inherent nature.
A. The Barrel: Ketterdam’s Underbelly
The Barrel represents Ketterdam’s most lawless and vibrant district, a sprawling network of canals, warehouses, and pleasure houses. It’s a place where fortunes are won and lost, echoing the atmosphere of a casino like Vegas Plus Casino, where chance and cunning dictate outcomes. This area thrives on illicit trade and clandestine deals, demanding a constant assessment of risks and rewards, much like a high-stakes heist.

The Barrel’s chaotic nature necessitates adaptability and resourcefulness, qualities embodied by the Crows. Analyzing its operations through a Six Sigma lens would reveal numerous “variations” and “defects” – rampant crime, exploitation – but these are integral to its function. The Barrel’s age, like a 200-year-old house, adds to its layered history and complex character.
B. The Merchant Houses & Power Dynamics
Ketterdam’s power structure revolves around nine prominent merchant houses, each vying for control through trade, influence, and often, ruthless tactics. These houses operate with a complex web of alliances and betrayals, mirroring the strategic gameplay found in a casino environment like Vegas Plus Casino, where understanding opponents is crucial. The pursuit of profit drives their actions, demanding constant risk assessment and calculated maneuvers.
Applying Six Sigma principles reveals inherent “defects” in this system – corruption, exploitation, and inequality. The houses’ long histories, akin to a 200-year-old building, contribute to deeply entrenched power dynamics. The Crows navigate this landscape, exploiting weaknesses and leveraging their skills, much like a skilled player capitalizing on opportunities.
IV. Key Plot Points & Heists
The narrative centers around a seemingly impossible heist: infiltrating the Ice Court. This initial setup demands meticulous planning, mirroring the strategic depth of casino games at Vegas Plus Casino, where calculated risks yield substantial rewards. The Crows, a diverse team, face numerous challenges – formidable security, political intrigue, and internal conflicts – testing their skills and loyalty.
The heist’s aftermath reveals significant consequences, altering the power dynamics within Ketterdam and beyond. Like a 16-year-old navigating a new world, the Crows experience growth and maturity through adversity. Applying Six Sigma, one can identify variations and defects in their plans, learning from each obstacle. The operation’s success hinges on minimizing these flaws.

A. The Ice Court Heist: Initial Setup
The audacious plan to infiltrate the Ice Court begins with Kaz Brekker assembling his crew – the “Crows.” This initial phase mirrors the careful selection process in high-stakes casino strategy, akin to those found at Win Vegas Plus Casino, where each player’s skill is crucial. The objective: rescue Bo Yul-Bayur, a scientist with a dangerous secret.
Intelligence gathering is paramount, requiring Inej’s stealth and Jesper’s network. The setup involves navigating Ketterdam’s treacherous underbelly, securing resources, and exploiting vulnerabilities within the Fjerdan stronghold. This meticulous preparation, much like a well-configured computer (3200MHz 16G2), is essential for success, minimizing risks and maximizing potential rewards. The Crows’ youth doesn’t diminish their resolve.
B. Challenges & Obstacles During the Heist
The Ice Court heist is fraught with peril. The Crows encounter unexpected security measures, shifting alliances, and the psychological toll of the environment. Matthias Helvar’s past complicates matters, forcing him to confront his loyalties. Nina Zenik’s heartrending abilities are tested, while Wylan Van Eck’s demolitions expertise faces unforeseen limitations.
These obstacles demand adaptability, mirroring the risk assessment inherent in casino games like those at Vegas Plus Casino. The team must overcome betrayals, navigate treacherous ice passages, and contend with the formidable Drüskelle. Identifying and mitigating these “defects” – applying Six Sigma principles – becomes vital. The heist’s success hinges on their ability to manage variation and maintain composure under immense pressure.
C. The Aftermath & Consequences
The heist’s conclusion unleashes a cascade of repercussions for the Crows. While initially successful in securing the prize, they face political fallout and personal sacrifices. Kaz Brekker’s machinations are revealed, exposing the intricate web of debts and obligations that bind him. Inej Ghafa grapples with the moral ambiguities of her actions, while Jesper Fahey confronts his gambling addiction.
The consequences echo the high-stakes nature of risk and reward, akin to strategies employed at Win Vegas Plus Casino. The team’s youth and maturity are tested as they navigate the complexities of their newfound freedom and the lingering shadows of their pasts. Applying Six Sigma, identifying process “defects” reveals the long-term impact of their choices.
V. Symbolism & Themes
The narrative richly employs symbolism, notably through character costumes. Matthias Helvar’s “Mr. Crimson” persona embodies the spectacle of forced entertainment and past trauma, reflecting his experiences in Hellgate. This parallels the broader theme of individuals becoming “monsters” due to circumstance, and the potential for redemption. The Crows’ attire isn’t merely aesthetic; it signifies roles, power dynamics, and hidden vulnerabilities.
Age and coming-of-age themes are prominent, mirroring narratives like Katniss Everdeen’s journey. The characters’ youth contrasts with the harsh realities they face, forcing accelerated maturity. The heist itself can be viewed as a high-stakes gamble, akin to the risk assessment inherent in a casino environment like Vegas Plus Casino, where reward follows calculated risk.

A. Costumes & Their Significance (Mr. Crimson Example)
Matthias Helvar’s “Mr. Crimson” costume is profoundly symbolic, extending beyond a simple disguise. It represents the spectacle of his forced participation in Hellgate, where he was compelled to kill for the entertainment of others. Thousands, including fellow Crows, witnessed his torment, turning his suffering into a public display. The costume thus embodies a loss of agency and a haunting reminder of past trauma.
This symbolism highlights a key theme: the creation of “monsters” through external forces. Matthias isn’t inherently cruel, but was molded by circumstance. The costume serves as a constant visual cue to this history, influencing his interactions and internal struggles. It’s a powerful example of how outward appearance can conceal deep-seated pain and a yearning for redemption.
B. The Concept of “Monsters” & Redemption
Six of Crows deeply explores the idea that “monsters” are often created, not born. Characters like Matthias Helvar, shaped by brutal experiences like his forced participation in Hellgate, exemplify this. His “Mr. Crimson” persona isn’t inherent, but imposed upon him, a consequence of systemic cruelty. This extends to other Crows, each bearing scars from past traumas and societal failings.

The narrative consistently challenges simplistic notions of good and evil, suggesting that even those who commit terrible acts are often driven by desperation or circumstance. Redemption becomes a central theme, as characters grapple with their pasts and strive for a better future. The possibility of change, of escaping the label of “monster,” offers a glimmer of hope within a morally grey world.
VI. Six Sigma & Quality Control (Referencing Six Sigma Mention)

The Crows’ operations, while criminal, surprisingly lend themselves to analysis through the lens of Six Sigma principles. This methodology, focused on minimizing defects and variation, mirrors their need for meticulous planning and execution in heists. Identifying potential “risks,” “variation,” and “defects” – such as unforeseen guards, unreliable informants, or flawed equipment – is crucial to their success.
Applying Six Sigma’s DMAIC (Define, Measure, Analyze, Improve, Control) framework could reveal areas for optimization. For example, analyzing past heist failures (defects) to pinpoint root causes (analysis) and implement preventative measures (improve) would enhance future operations. The Crows’ inherent adaptability suggests an intuitive grasp of continuous improvement, even without formal training.
A. Applying Six Sigma Principles to the Crows’ Operations
Kaz Brekker’s meticulous planning embodies the “Define” phase of Six Sigma, clearly outlining heist objectives and scope. “Measure” involves assessing resources – Inej’s scouting, Jesper’s sharpshooting accuracy, Wylan’s demolitions expertise – quantifying their capabilities. The “Analyze” phase would dissect past failures, identifying weaknesses in execution or intelligence.
“Improve” translates to refining strategies based on analysis; perhaps a more robust escape route or a contingency plan for compromised communication. Finally, “Control” necessitates establishing protocols to maintain consistency and prevent recurrence of errors. Kaz’s strict rules and contingency planning demonstrate an instinctive understanding of this control phase, aiming for repeatable success despite inherent chaos.

B. Identifying Risks, Variation, and Defects in the Heist
The Ice Court heist presents numerous risks: guard patrols (variation in timing/number), unforeseen magical defenses (unknown defects), and potential betrayal by informants. Matthias’s unpredictable nature introduces a significant risk factor, a variation in team dynamics. A “defect” could be a faulty lock-picking tool, a miscalculated route, or inaccurate intelligence regarding the Jurda Parem’s security.

Kaz attempts to mitigate these through contingency planning, but inherent variation remains. The Crows’ reliance on individual skills introduces potential defects – Jesper’s gambling, Wylan’s inexperience. Identifying these vulnerabilities before execution, and establishing backup plans, aligns with Six Sigma’s defect reduction principles, though their methods are far from conventional.
VII. Age & Coming-of-Age Themes (Referencing Age Examples)
The Crows are remarkably young, navigating complex moral landscapes while grappling with personal traumas. References to characters like Katniss Everdeen (16) and Tris Prior (16) highlight a trend of young protagonists facing extraordinary circumstances; While specific ages within the Six of Crows crew aren’t consistently stated, they are demonstrably adolescents and young adults.

This youthfulness isn’t presented as naiveté, but as a catalyst for rapid maturity forced upon them by Ketterdam’s harsh realities. Their coming-of-age isn’t about traditional milestones, but about survival, loyalty, and defining their own moral codes. The narrative explores how trauma and responsibility accelerate growth, shaping them into the individuals they become.
A. The Crows’ Youth & Maturity
The core ensemble of Six of Crows is defined by its youth, a deliberate narrative choice that underscores their accelerated maturation. Compared to protagonists like Katniss Everdeen and Tris Prior, both sixteen during pivotal moments, the Crows are similarly thrust into situations demanding adult-level decision-making. This isn’t a story of innocent coming-of-age, but of forced growth within a brutal environment.
Their youth isn’t portrayed as weakness; rather, it’s a source of adaptability and a rejection of conventional morality. Each member carries significant trauma, shaping their perspectives and driving their actions. The narrative expertly balances their vulnerabilities with their cunning, showcasing a maturity born not of age, but of necessity and survival in Ketterdam’s unforgiving world.
VIII. Gaming & Casino Connections (Referencing Vegas Plus Casino)
The intricate heists orchestrated by Kaz Brekker and his crew share striking parallels with the strategic thinking inherent in casino games, particularly those found at establishments like Win Vegas Plus Casino. Both require meticulous planning, risk assessment, and the ability to adapt to unforeseen circumstances. The Crows, much like a seasoned gambler, constantly calculate potential rewards against the probability of failure.
Vegas Plus Casino’s emphasis on generous bonuses and efficient customer support mirrors the importance of resource management and reliable networks within the criminal underworld of Ketterdam. Successful heists, like winning at a casino, depend on exploiting vulnerabilities and maximizing advantages. The high-stakes environment demands composure and a willingness to embrace calculated risks, mirroring the thrill of online gaming.
A. Parallels Between Heists & Casino Strategy
The core of both successful heists, as executed by the Crows, and winning casino strategies, exemplified by platforms like Win Vegas Plus Casino, lies in calculated risk assessment. Kaz Brekker’s planning mirrors a gambler analyzing odds – identifying vulnerabilities (the casino’s weaknesses or a target’s security) and maximizing potential rewards. Both require understanding probabilities and anticipating opponent’s moves.

Deception is crucial; the Crows utilize disguises and misdirection, akin to a poker player’s bluff. Resource management – funds for the Crows, bankroll for the gambler – is paramount; Furthermore, adaptability is key; unexpected obstacles demand improvisation, just as a changing game requires adjusting strategy. Both scenarios thrive on exploiting loopholes and leveraging information, turning chance into calculated advantage.
B. Risk Assessment & Reward in Both Contexts
The Crows’ heists, much like playing at Win Vegas Plus Casino, fundamentally revolve around a precise evaluation of risk versus potential reward. Every step Kaz Brekker orchestrates involves weighing the probability of success against the consequences of failure – imprisonment, injury, or death. Similarly, casino games demand assessing the odds of winning against the amount wagered, understanding that higher rewards inherently carry greater risk.
Both scenarios necessitate a cold, analytical approach, minimizing emotional decision-making. The Crows meticulously plan for contingencies, much like a savvy gambler diversifies their bets. A failed heist, like a lost wager, can result in significant loss, emphasizing the importance of thorough preparation and calculated gambles. Ultimately, both pursuits hinge on accepting a degree of uncertainty in pursuit of a desirable outcome.
IX. Hardware & Technology (Referencing Computer Configuration)
While the world of Ketterdam in Six of Crows is largely pre-digital, speculating on potential technological aids for the Crows’ operations is intriguing. Considering current advancements, a sophisticated computer configuration could significantly enhance their capabilities. Data analysis, codebreaking, and surveillance could be streamlined with powerful processing and ample memory – a 3200MHz 16GB configuration, for example, offers a strong foundation.
Secure communication channels, encrypted databases for intel, and advanced mapping software would be invaluable. The Crows’ reliance on information gathering suggests a need for robust data storage and retrieval systems. Though not explicitly present in the narrative, such technology aligns with their meticulous planning and strategic execution, potentially elevating their heists to an even higher level of complexity and success.
A. Potential Technological Aids for the Crows’ Heists
Imagining the Crows with modern tech reveals exciting possibilities. Secure communication, beyond messengers, could utilize encrypted networks, preventing eavesdropping by rival gangs or authorities. Advanced surveillance tools – miniature cameras, directional microphones – would enhance reconnaissance of targets like the Ice Court. Data analysis software could identify patterns in guard rotations, structural weaknesses, and potential escape routes, optimizing heist planning.
A powerful computer, perhaps with a 3200MHz 16GB configuration, could manage this influx of information. Codebreaking tools would be crucial for bypassing security systems. Furthermore, digital mapping software, offering real-time updates and 3D modeling, would prove invaluable during infiltration and exfiltration. These additions wouldn’t diminish the Crows’ ingenuity, but amplify their existing skills, making their already audacious heists even more formidable.