
Aroma Diffuser User Manual PDF: A Comprehensive Guide
Welcome to our comprehensive guide! This resource provides easy-to-understand instructions for operating your aroma diffuser. Access a wide range of PDF user manuals to enhance your aromatherapy experience and ensure safe operation.
Understanding the Aroma Diffuser
An aroma diffuser is a modern device designed to disperse essential oils into the air‚ creating a fragrant and therapeutic atmosphere. These devices utilize various technologies‚ with ultrasonic diffusers being the most common. Ultrasonic diffusers use electronic frequencies to create vibrations that break down essential oils into microparticles without heat. This cool mist preserves the integrity of the essential oils‚ ensuring that their beneficial properties are maintained.
Besides scenting a room‚ aroma diffusers can also act as humidifiers‚ adding moisture to the air‚ which is particularly beneficial in dry environments or during the winter months. Some diffusers also incorporate ambient lighting features‚ allowing users to create a relaxing and visually appealing environment. Understanding the basic functions and components of your aroma diffuser is crucial for optimal use and maintenance.
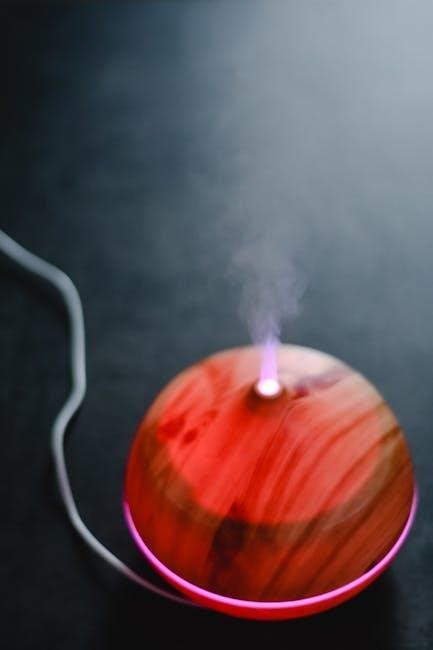
Key Components of an Aroma Diffuser
Aroma diffusers‚ while varying in design‚ share several key components essential for their functionality. These include the water tank‚ which holds the water and essential oil mixture; the atomizer plate‚ responsible for creating the ultrasonic vibrations that produce mist; and the air outlet‚ through which the fragrant mist is released into the surrounding environment. Understanding these components is crucial for proper operation and maintenance.
Additional components may include a DC socket for power connection‚ an air intake to facilitate airflow‚ and various control buttons for adjusting settings such as mist intensity and timer functions. Some models also feature LED lights for ambient lighting and drainage outlets for easy cleaning. Familiarizing yourself with each part ensures optimal performance and longevity of your aroma diffuser.
Water Tank
The water tank is a fundamental component of any aroma diffuser‚ serving as the reservoir for water and essential oil mixtures. Its capacity varies depending on the model‚ often ranging from 100ml to 500ml‚ dictating the diffuser’s runtime. Most tanks feature a “MAX” fill line to prevent overfilling‚ which can damage the device;
Proper maintenance of the water tank is crucial. Regular cleaning prevents the buildup of mineral deposits and residue from essential oils‚ ensuring optimal mist production and preventing bacterial growth. Always empty and clean the tank after each use‚ especially before switching to a different essential oil. Using clean‚ distilled water is also recommended to prolong the life of the diffuser and maintain air quality.
Atomizer Plate
The atomizer plate‚ also known as the ultrasonic chip‚ is a critical component responsible for creating the mist in aroma diffusers. It uses high-frequency vibrations to break down the water and essential oil mixture into a fine vapor‚ which is then dispersed into the air. This small‚ often metallic‚ disc requires careful handling.
Cleaning the atomizer plate is essential for maintaining optimal diffuser performance. Mineral deposits and essential oil residue can accumulate on its surface‚ hindering its ability to produce mist. Gently clean the plate with a cotton swab dipped in rubbing alcohol or white vinegar. Avoid using abrasive cleaners or sharp objects‚ as these can damage the delicate surface. Regular cleaning ensures consistent mist output and prolongs the life of your aroma diffuser.
Air Outlet
The air outlet is the designated opening on the aroma diffuser through which the fragrant mist is released into the surrounding environment. Its design and placement significantly impact the direction and dispersion of the aroma. Some diffusers feature a single‚ fixed outlet‚ while others offer adjustable nozzles to customize the mist flow.
It’s important to ensure the air outlet remains unobstructed for optimal performance. Avoid placing the diffuser near walls‚ furniture‚ or other objects that could block the mist’s path. Regularly inspect the outlet for any buildup of dust or residue‚ and gently clean it with a soft cloth if necessary. Proper maintenance of the air outlet ensures consistent and effective aroma diffusion‚ allowing you to fully enjoy the benefits of your essential oils.
Operating Instructions
To begin‚ ensure the aroma diffuser is placed on a stable‚ level surface‚ away from water-sensitive items. Carefully remove the top cover‚ usually by lifting it vertically; Next‚ fill the water tank‚ being mindful not to exceed the indicated “MAX” fill line; using too much water can impair its function.
Add a few drops of your preferred essential oil to the water. The quantity can vary‚ but generally‚ two to three drops per 100ml of water are recommended. Replace the cover securely. Connect the power adapter to the diffuser’s base and then plug it into an electrical outlet.
Press the power button to turn on the diffuser. Many models offer timer settings‚ allowing you to select how long the diffuser will operate. Experiment with these settings to find what suits your needs.
Filling the Diffuser with Water and Essential Oils
Before initiating‚ ensure the diffuser is disconnected from the power source. Remove the top cover carefully‚ usually by lifting it vertically. Locate the water tank inside the base. Using a clean container‚ pour water into the tank‚ being cautious not to exceed the “MAX” fill line indicated inside.
Overfilling can prevent proper mist generation and potentially damage the device. Avoid using hot or boiling water‚ as this could harm the diffuser’s components. Once the water is at the correct level‚ add a few drops of your preferred essential oil. The amount varies based on oil potency and desired aroma strength; starting with 2-3 drops per 100ml of water is a good starting point.
Always use water-soluble essential oils. After adding the oil‚ gently replace the top cover‚ ensuring it is securely in place to prevent leaks during operation.
Powering On/Off and Setting Timer
After filling the diffuser with water and essential oils‚ connect the power adapter to the DC socket on the base of the unit‚ then plug it into a wall outlet. To power on the diffuser‚ locate the power button‚ often marked with a universal power symbol. Press it once to initiate mist diffusion.
Many diffusers have timer settings that allow you to control the duration of operation. These settings are typically accessed via buttons labeled with time intervals (e.g.‚ 1H‚ 3H‚ 6H) or an “ON/OFF” switch. Press the appropriate button to select your desired run time. Some advanced models offer continuous diffusion mode.
To turn off the diffuser‚ press the power button again. The unit will automatically shut off when the water tank is empty‚ as a safety precaution. Unplug the power adapter from the outlet when not in use.
Adjusting Mist Intensity
Many aroma diffusers offer the capability to adjust the mist intensity‚ allowing you to customize the aromatherapy experience to your preference. The method for adjusting mist intensity can vary depending on the model of your diffuser.
Some diffusers feature buttons specifically labeled “High” and “Low” or a similar indication. Pressing these buttons will toggle between different mist output levels. Other models might have a continuous dial or slider that allows for more gradual adjustment. Rotating the dial or sliding the control will increase or decrease the mist output.
Refer to your diffuser’s user manual for specific instructions on how to adjust the mist intensity. Experiment with different settings to find the level that provides the optimal balance of fragrance and humidity for your environment. Remember that higher intensity settings will consume water and essential oils more quickly.
Cleaning and Maintenance
Regular cleaning is crucial to maintain the performance and longevity of your aroma diffuser. Mineral buildup from water and essential oil residue can clog the atomizer plate and reduce mist output.
Before cleaning‚ always unplug the diffuser. Empty any remaining water from the tank and wipe it clean with a soft cloth. For stubborn residue‚ use a solution of water and white vinegar. Gently scrub the inside of the tank‚ paying attention to the atomizer plate. Rinse thoroughly with clean water and dry completely before the next use.
The frequency of cleaning depends on usage‚ but a weekly cleaning is generally recommended. For diffusers with removable parts‚ refer to the user manual for specific cleaning instructions. Avoid using harsh chemicals or abrasive cleaners‚ as they can damage the diffuser. Store the diffuser in a dry place when not in use.

Troubleshooting Common Issues
Encountering issues with your aroma diffuser? Here’s a guide to troubleshoot common problems. If the diffuser doesn’t power on‚ check the power adapter connection and outlet. Ensure the diffuser is placed on a level surface.
If mist output is low‚ verify the water level isn’t exceeding the maximum line. Clean the atomizer plate with a cotton swab dipped in rubbing alcohol to remove mineral buildup. Ensure you’re using water-soluble essential oils‚ as thick oils can clog the system.
If the diffuser makes excessive noise‚ check for debris inside the water tank. For flickering lights‚ consult the user manual or contact customer support. If these steps don’t resolve the issue‚ refer to the manufacturer’s troubleshooting guide or seek professional assistance. Always disconnect the diffuser before attempting any repairs.

Safety Precautions
To ensure safe and proper use of your aroma diffuser‚ please adhere to these precautions. Always unplug the diffuser before cleaning or performing maintenance. Keep the diffuser out of reach of children and pets.
Avoid overfilling the water tank‚ as this can cause damage. Use only water-soluble essential oils; alcohol-based oils can damage the unit. Never operate the diffuser without water‚ as this can overheat the atomizer plate. Place the diffuser on a stable‚ water-resistant surface‚ away from walls‚ furniture‚ and appliances.
Do not immerse the base of the diffuser in water. If the diffuser emits a burning smell or unusual noise‚ immediately unplug it and contact customer support. Do not attempt to disassemble or repair the diffuser yourself.
Essential Oil Usage Guidelines

To maximize the benefits and longevity of your aroma diffuser‚ adhere to these essential oil usage guidelines. Always use pure‚ high-quality essential oils. Start with a small amount‚ typically 2-3 drops per 100ml of water‚ and adjust to your preference.
Be aware that some essential oils may corrode plastic components. Clean the diffuser regularly to prevent residue buildup. Avoid using thick or viscous oils‚ as they can clog the atomizer. Ensure proper ventilation when using essential oils‚ especially for those with sensitivities.
Consult with a qualified aromatherapist or healthcare professional before using essential oils‚ especially if you are pregnant‚ nursing‚ have allergies‚ or pre-existing health conditions. Keep essential oils stored in a cool‚ dark place‚ away from direct sunlight and heat. Dispose of used essential oil bottles properly.
Integration with Smart Home Systems (If Applicable)
If your aroma diffuser features smart home integration‚ explore the seamless control and automation possibilities it offers. Many smart diffusers connect to your home’s Wi-Fi network‚ enabling control via a dedicated mobile app or voice assistants like Amazon Alexa or Google Assistant.
Follow the manufacturer’s instructions for pairing your diffuser with your smart home system. Once connected‚ you can remotely power the diffuser on/off‚ adjust mist intensity‚ set timers‚ and even customize lighting effects (if available). Create routines to automatically activate the diffuser at specific times of day or in conjunction with other smart devices.
Ensure your smart home system is compatible with the diffuser’s specifications. Regularly update the diffuser’s firmware and app for optimal performance and security. Consult the troubleshooting section of this manual or the manufacturer’s website for assistance with connectivity issues.